Setup for Non-Metal and Expanded Metal
How to configure your torch height coordinates on your laser-cutting machine when cutting non-metal and expanded metal materials
by Joe Fiorito, Applications Engineer at Mazak Optonics Corp.

When laser-cutting, there are certain applications we cannot rely on the height sensor to control the position of the torch above the material. One of the more common examples of this is expanded metal. However, the same techniques used to cut expanded metal can also be used to cut non-metallic materials like certain plastics, rubbers, or organic materials.
The first step in utilizing this laser-cutting application will be to acquire the specialized tech tables from the applications team. They can be reached by either calling Mazak’s applications department at 1-(888)-MAZAK-US or via email at applications@mazaklaser.com. Once the tech tables are uploaded to the control, the machine can be set up to cut the material.
These tech tables work the same as any other standard tech table, but require some additional setup in order to work efficiently. Since we will not be using the height sensor to control the Z-axis, we will command machine Z coordinates in the tech table for the various machine functions we will be using.
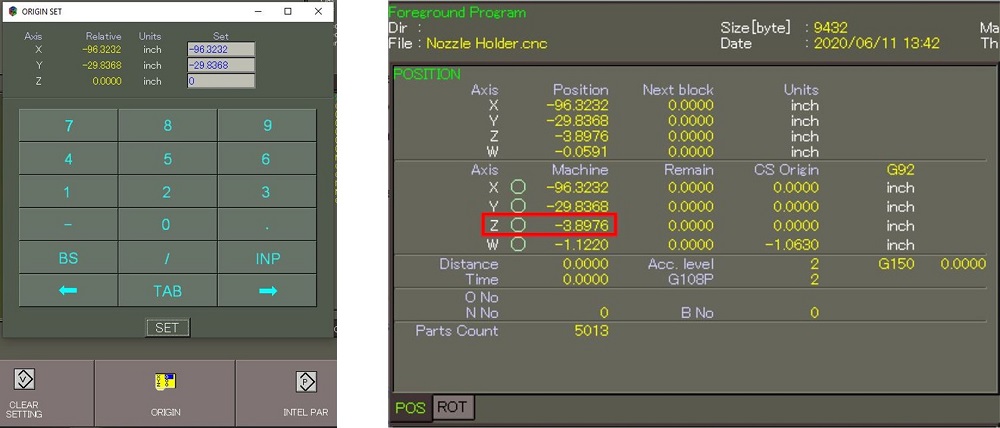
First, we can set up the cutting height. In order to do this, manually wheel the torch down until it gently touches the top of the material. At this point you can use the ORIGIN function to precisely control how high above the material the torch will cut from. Press the ORIGIN button from the COMMAND screen and then set the Z-Axis Relative measurement to 0. To do this, type in “0.0” under the SET column, and then press SET at the bottom of the pop-up window. From here, you can manually move the torch up exactly 0.040” by watching the RELATIVE column. This is our normal cutting height (0.040” ≅ 1mm).

We can now enter the machine Z coordinate into our tech table. The machine’s Z coordinate can be found in the top left quadrant of the COMMAND screen. This coordinate can now be placed into your cutting conditions. The field designated for this parameter is denoted, Z HEIGHT or INIT Z RAISE. Keep in mind that this will be a negative number as this is in absolute machine coordinates.
Additionally, if your application requires a Lead-In condition then you will need to enter the data on the LEAD-IN tab as well. The next tab we will need to set up will be the PIERCING tab. Depending on your machine and pierce type, this will either be on the QUICK or STEP secondary tab. For this field we will not be putting in the same value we did on the other pages. Typically we pierce anywhere from 3mm to 6mm above the surface of the material depending on the particular material. Set the Z HEIGHT on this tab a minimum of 3mm (≅0.120”) higher than what you entered for the cutting conditions.
Now that the positions are configured, you can fill in the rest of the tech table with the remainder of the cutting conditions. If you are cutting expanded metal, you can copy in the settings from the tech table for that material type and thickness. If you are cutting non-standard materials then you can reach out to the applications department for help developing your cutting tech. In such applications, please contact the applications department to ensure the material is safe to process on the laser.
Since we are not using the height sensor to track the material, we do have to be mindful of the machine while it is running. If the material is not sitting flat on the bed, you can run the risk of the torch hitting the material. If the material is bowed, the table slats are worn down, or the material warps due to heat, the torch could potentially experience interference.
For more information, please contact Mazak customer support at 1-888-MAZAK-US.


